


Photobucket
Photobucket
Showing posts with label beauty products. Show all posts

Tuesday, May 29, 2012

maniCURATIVE: Sally Hansen's Salon Effects Real Nail Polish Strips


I've been dying to do a maniCURATIVE posts for ages, and thought now would be the perfect time to do one on Sally Hansen Salon Effects Real Nail Polish Strips, which I use at least once a month and love to pieces!!! So....... let's get started! Here's what I used:


Step One: Opi Ridge Filler Base Coat (I'm using this for the first time, since my favorite base coat, Essie Fill the Gap! seems to have dropped off the map!)
Step Two: Sally Hansen Salon Effects Real Nail Polish Strips (In  Haute and Naughty .. plus a surprise!)

The first thing I do is assemble everything I need on one surface. I lay the strips out for easy access, which makes it easy to grab and use when I'm ready to.


Haute and Naughty (pictured above) is not the only shade I ended up using, but since the second color was a last minute decision, I didn't have it ready on hand.

Anyway, I started with applying a single layer of the base coat, O.P.I's Ridge Filling Base Coat... I like so far. It dries very fast, which is always a plus!


Once the Base Coat is completely dried, I find the best sized strip to fit my nail bed. Once the best one has been selected, I peel the clear protective plastic cover.


Then I peel the nail polish strip itself from the backing paper.


I'm now ready to apply. So placing the strip against my cuticle line, I slowly press the strip to my nail, rubbing and smoothing the strip along my nail, to ensure it will bond to my nails.


Once the strip is secured to the nail beds, I gently run it across the tips of my nails and when I'm confident the strip is exactly the way I want it, I gently pull the excess strip away. If this is your first time using the strips and you're afraid of going overboard, feel free to use the handy file included with the kit to file away the excess.


Once the first nail is done, I repeat the process on the other nails. At this point, I decided it might be fun to try two different shades, so in addition to Haute and Naughty, I also used Mod About You on the ring fingers of my hands.


I thought that the pattern would be a nice pop of color in contrast with the dark and dramatic shade.


Once all the strips have been applied, this is what it looks liked...


Now, the last steps is to fill away any jagged pieces or excess to smooth and apply the top coat. I love Seche Vite because it is super fast drying, which means in a few minutes... I'm done!!


Have you tried Sally Hansen Salon Effects Real Nail Polish Strips before? What has been your experience? What is your favorite shades?

Wednesday, February 22, 2012

I'm REALLY Diggin': My Shade of Brown's Pillow Boxes


Seriously, how excited was I when I learned about My Shade of Brown?!?! The Brooklyn-based company delivers beauty samples specifically for women of color to enjoy and try out once a month in their lovely Pillow Boxes!

For a monthly $10 membership fee (You can also purchase a yearly membership for $110), you'll receive 4 or 5 samples of amazing beauty products tailored to women of color. You'll get anything from foundation to nail polish to try out at home! If you love the samples, you have the opportunity to purchase the full-size version from the My Shade of Brown shop, making the site a one stop source to try awesome beauty products before committing to buy... and for every dollar spent you earn loyalty points! How cool is that?!?? I could not wait until I received my first Pillow Box in the mail!!


And I was not in the least bit disappointed by what I received! I was a like a little kid at Christmas!!! Here's what I got to dig into (From left to right):

Georgia by G and Company Rosemary Luxury Skin Wash: If I could drink this stuff, I would.. it smells fantastic!!!

Big Girl Lip Shine in Blossom: I was bowled over by this shade because it was PERFECT for a sweet pouty lip!!

Pooka Pure and Simple Pomegranate Body Butter: I was super excited to see this product, because I am a huge fan of the women behind this brand, The Pookalitas!! after trying it out, the sample went right into my purse for everyday use!

Lamik True Mineral Powder in Warm Chocolate: I've been DYING to try Mineral Powder, so suffice to say I was like "Yes!!" when I pulled this out of my Pillow Box! Warm Chocolate is unfortunately a little too dark for my complexion, but applying it was a breeze, and I was really excited about the smooth and light coverage! I will be definitely purchasing the Warm Caramel, which I think is a bit closer to my skintone.

Yana Cosmetics Foundation No. 10: A little goes a super long way with this foundation, just a few dabs of the sample was enough for full coverage!! Love it!!


Check out My Shade of Brown at http://www.myshadeofbrown.com/ to get their amazing Pillow Boxes sent to your door!

Friday, September 24, 2010

And Now...A Makeup Moment: M.A.C's Venomous Villains Collection!! (Pt. 2)


Picture courtesy of Jay the Bohemian Diva

So Tuesday night, I was super duper exhausted when typing about my first visit at the MAC store to check out the Venomous Villians Collection, so I decided to create a two-part blog to cover the event. As I wrote in Part One, this was my first time ever visiting a MAC store, and looking around at all the goodies MAC had to offer was ker-ay-zee!!!


One cool, fun part of the event is that we had the opportunity to dress up like our favorite Venomous Villain!!!!

Me with the Evil Queen from Snow White. She's throwing shade and I'm throwing it right back at her! LMAO


Here's Jay, dressed up like Cruella.... doesn't she looks totally Diva-licious!?!?!? From some odd reason, Cruella's costume translated into Old Black Church Lady the moment I put it on!! LMAO


"And now Sister Moon will read from First Corinthians......" Hahahahahahahahahahahahaaaa!!

So after Jay and I had our fill of everything the MAC store had to offer, we parted ways and I headed back to Brooklyn with my lovely black bag full of goodies. Here's what I got:


Violetta (Amplified) Lipstick - Maleficent
Hot House Lipglass - Evil Queen
Magenta Lip Crayon (For lining! Not part of the Venomous Villians Collection)


This is Violetta Lipstick. It's a cute tube, but I am thinking in hindsight that I should have taken a picture of the ACTUAL color!!!


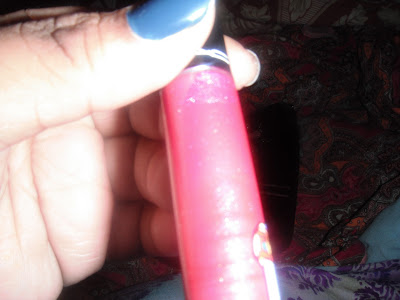
Here's the Hot House Lipglass.... I actually took a picture that shows the color this time around! LOL


So that's what I purchased. And I am really enjoying the colors and like Jay said in her post about the event, Girly Girl Time: M.A.C.'s preview of the "Venomous Villians Collection", I am a convert. LOL

Saturday, August 21, 2010

And Now...A Makeup Moment: Perfecting a Purple Pout

A trend I've been noticing when people-watching is a surge of women rocking plum and/or purple-hued lipsticks. I'm a huge fan of this trend, but have yet to find a color that works for me! So I took to the internet to find inspiration and possible color options.

So you know I have to start with my homegirl (in my head), Tracee Ellis Ross - Thankfully Essence Magazine online did a story on purple lips as part of their 'Go There' Wednesday feature, so I had an excellent place to start!!!


The folks at Essence suggested the following shades to D-I-Y:


Bare Escentuals Buxom Big & Healthy Lip Balm in St. Barts ($15, Sephora)


Tokidoki Fantastico Lip Stain in Carnivora ($15, Sephora)


Since I'm not about completely swagger-jacking the glossies for this blog, the next few looks (with the makeup suggestions) are courtesy of yours truly! lol


I like Rihanna (Bajan Pride, I guess!), but she's never worn make up that has made me go, "Oooh... that's pretty!". Well, ooh... that's pretty!!!

I suggest the following shades to recreate Rihanna's look:


CoverGirl Queen Collection Vibrant Hue Color Lipstick, Toast Of The Town 430 ($5.99, Amazon.com)


Sephora Collection Maniac Long Wearing Lipstick #18 ($12, Sephora)


I love it when black women buck the rules and dare to rock colors "they have no business wearing".... I especially like it when the results are a fantastic as Estelle's.

To recreate Estelle's look, I found the following shades:


MAC Plushglass Oversexed ($9.99, BeFlurt)


Urban Decay Lipstick in Jilted ($22.00, Macy's)

Friday, February 19, 2010

D-I-Y Nappturaliciously: Miss Jessie's Super Sweetback Treatment Review

This will be the first product from Miss Jessie's line that I ever tried. When I read about Miss Jessie's Super Sweetback Treatment, I thought that a)this would be a great Valentine's Day Present to Myself and b) this would be a good product to try for the first time!


According to Miss Jessie's: Miss Jessie's Super Sweetback Treatment is the essential treatment for growing out naturally curly, kinky, and wavy hair. Healthy growh and length is what most curlies covet. Miss Jessie's can assist you in this process. An elongated curl has more bounce, is more manageable, and is less prone to frizz. Be Super Sweet to your curls. Miss Jessie's Super Sweetback Treatment is a decadent softening treatment which ensures that your curls reach long luxurious lengths. This reach treatment full of shea butter and centella extract is a growth stimulant that promotes long healthy curls. Your hair is gonna love you for this!

The Ingredients: Water (Agua), Behentrimonium, Methosulfate (and) Cetyl Alcohol, Stearyl Alcohol, Cyclopentasiloxane, Butyrospermum Parkii (Shea Butter), Fragrance, Dimethicone, DMDM Hydantoin (and) Ioopropynyl Butylcarbamate, Ceteareth-20, Hydroxyethylcellulose, Hydrolyzed Soy Protein, Lipsome (Centella Asiatica), Aloe Barbadensis Leaf Juice, EDTA Disodium, Tocopheryl Acetate, Mangifera Indica (Mango) Seed Butter, D&C Red #33, Citric Acid

The Process: As per my usual cleansing routine, I separated my hair into four sections which I loosley braid. In the shower I loosen each section, finger detangle, apply shampoo (Apoghee Shampoo for Damaged Hair), lather, comb with shampoo comb and rinse out. After rinsing, I loosely braid it back up and move on to the next section.

Once out of the shower, I took down each braided section and applied a small scoopful of Super Sweetback Treatment, smoothing down each section from root to ends.

In the jar, the smell was very subtle and nice, kind of like Juicy Fruit gum. This is smelling it while the protective seal is still on, mind you. Once I opened it and started to apply it, the smell took on a smell that was more like Pepto Bismol Chewtabs... which isn't necessarily a bad thing, but it's no Juicy Fruit! LOL

According to Miss Jessie's: After applying, run a wide tooth comb through hair to detangle.


This isn't part of my usual regime, so I did it my way. After adding the treatment to the section, I braid it right back up and keep it moving.

The slip is amazing, though I've always heard from Jess Heads that their conditioners have excellent slip. I would've been shocked and surprised if this was the exception.

After all four sections were done, I scooped a little bit more out of the jar and applied it solely on my ends (in their braids) and covered my hair up with a plastic conditioning cap.

According to Miss Jessie's: Super Sweetback Treatment's growing properties ae amplified when used during a steam treatment or under an overhead drying on a heated setting.

I deep condition using a heat cap (this is the only heat I've applied to my hair in almost two years!), so I covered applied this to my hair for about two hours (which is NOT my normal deep conditioning time... but I got caught up playing Wedding Dash.. LOL). The instructions recommend you keep it in for 30 minutes.


Sexy, huh? (And in case you're wondering... yes... that is a Snuggie!) LMAO

After washing the conditioning out of each section, I didn't notice a ridiculously dramatic difference, but my hair was soft and tangle-free and the curl definition was a bit more apparent.

I styled my hair in my normal braids and am now letting it try as I type this. So far, I like Miss Jessie's Super Sweetback Treatment. I plan on using it weekly (Replacing my Olive Oil Deep Conditioning Treatment) until it runs out... and at that time I will blog a follow up to this entry (So it will probably be a "I'm Really Diggin'" or a "Not So Much" entry... depending on the results! LOL


Tuesday, December 29, 2009

The Results are In: OPI's Suzi Skis the Pyrenees

So in my last blog post, I was writing about how excited I was to try my new OPI nail polish, Suzi Skis the Pyrenees

As promised, I just came back from the nail salon (Shout Out to, Nail Kraz in Bed-Stuy!) and I must like I really like the results.


My only gripe is that the polish was really thin, so the end result was achieved after three coats of polish was applied... but I really love how it looks on my fingers and toes!


Monday, December 28, 2009

I'm REALLY Diggin': OPI's Suzi Skis the Pyrenees

So, for months I have been sporadically searching for a black nail polish that didn't look like vinyl. I like dark hues for the nails... but I am long past my goth years and I really don't want to look like I just came in from the matinée of "New Moon", off to shop at Hot Topic!!

My search ended today when I went to Optima Beauty Supply Store in NYC (Where I also scored my Denman Brushes for cheapie cheap!) and laid my tired peepers on OPI's Suzu Skis the Pyrenees.


OPI Suzi Skis in the Pyrenees is part of OPI's newest collection OPI Coleccion De Espana. This is a professional quality nail polish and is very strong and durable. OPI Nail Polish works wonders on either natural fingernails or acrylic nails.

I was too winter-bear tired to head to the salon for a much-needed mani/pedi & eye-brow waxing tonight.. but tomorrow I will be sure to post pictures of the results.