One of my New Year's Resolutions for 2010 (well, my ONLY one thus far) is to learn how to bake. In the past I have shunned getting elbow-deep in flour because I figured I lack the patience and temperament to bake. In cooking, I never follow instructions 100%, choosing instead to improvise. And I know in baking you CANNOT really do that.
But I love looking at cake, cookies, and bread recipes and wondering how it would taste if I were to venture out of my comfort zone and cast off my preconceived notions about baking.
And for 2010, I plan on finding out if I have the chops to bake my own yummy treats. Here are a few goodies I can't wait to sample and tryout!
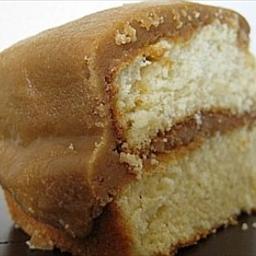
BUTTER CAKE WITH CARAMEL FROSTING
Recipe courtesy of
BigOven.com
INGREDIENTS
-- Cake --
3 cups cake flour, plus additional for preparing pans
1 cup unsalted butter (2-sticks), plus additional for preparing pans
3 teaspoons baking powder
1 teaspoon salt
2 cups superfine sugar
4 large eggs
1 cup whole milk
1 1/2 teaspoons vanilla extract
1 teaspoon lemon extract
1/2 teaspoon almond extract
-- Caramel Frosting --
1/2 cup unsalted butter (1-stick)
2 cups dark brown sugar, firmly packed
1/8 teaspoon salt
1 teaspoon vanilla extract
3 to 4 cups confectioners sugar, sifted
8 to 10 tablespoons heavy cream
2 cups black walnuts, toasted and finely chopped, for garnish (optional)
PREPARATION
To make cake: Place oven rack in center position and heat gas oven to 350 degrees F, electric oven to 325 degrees F. Generously butter or grease two 9-inch cake pans, dust pans with flour, knocking out excess; set aside. All ingredients should be room temperature. In a medium bowl, whisk together flour, baking powder and salt; set aside. In a large bowl, using an electric mixer on medium speed, cream together butter and sugar, until light and fluffy (or 150 strokes by hand). On medium speed, (or another 150 strokes) add eggs, 1 egg at a time, beating after each addition. Add flour mixture alternating with the milk, beginning and ending with the flour. Mix well after each addition, and scrape down sides of bowl with a spatula as needed. Beat in extracts. Pour batter into prepared pans and spread evenly. Place pans in middle of oven. Pans should not touch. Bake for 30 to 35 minutes, or until a toothpick inserted in the center of cakes comes out clean. When done, remove from oven and let cool in pans on wire rack for 10 to 15 minutes, then turn out onto the wire rack and let cool completely before frosting.
To make frosting: Melt butter in a cast-iron skillet or heavy saucepan set over medium-high heat. Add brown sugar and salt, stirring until sugar is completely melted. Transfer sugar mixture into mixing bowl and, using an electrical mixer on low speed, beat in vanilla. Add confectioners' sugar, about 1/2 cup at a time, alternately with heavy cream, beginning and ending with confectioners' sugar. Mix until well blended after each addition, and scrape down sides of bowl as needed. Continue beating until frosting becomes spreadable. If too thick, add a little more cream; or, if too thin, add a little more confectioners' sugar.
To frost cake: When cake has cooled completely, spread frosting over one layer of cake, top with second layer, then cover top and sides of entire cake with remaining frosting. Press toasted, chopped black walnuts on the sides of the cake, if desired.
Makes one 9-inch 2-layer cake, or about 10 to 12 servings.
TORTUGA CAYMAN ISLAND RUM CAKE
Recipe courtesy of
BigOven.com
The Tortuga Rum Cake story officially began in 1987. That's when Carlene Hamaty started baking rum cakes at home, using a family recipe that had been handed down through generations. She of course used Tortuga Rum as the main ingredient. This recipe is an approximation of the original.
INGREDIENTS
-- Rum Cake --
1 package Yellow cake mix
1 package Vanilla pudding instant
1/2 cup Vegetable oil
1/4 cup Water
1 cup Walnuts chopped
4 large Eggs
3/4 cup Tortuga Gold Rum
-- Glaze --
1/4 cup Water
1/4 cup Tortuga Gold Rum
1 cup Sugar
1 stick Butter
PREPARATION
Preheat oven to 325? F.
Lightly grease and flour a bundt pan. Sprinkle walnuts over the bottom of the pan.
Blend the dry cake mix, dry pudding mix, water, rum, oil and eggs for 2 minutes. Pour the batter over the walnuts in the pan and bake for 1 hour.
Prepare the Glaze 10 minutes before cake is finished baking.
Combine water rum, water sugar and butter in to sauce pan. Heat over medium heat, stirring until boiling. Boil for 2 minutes stiring occasionally.
Remove cake from oven. While in pan, gently stab cake with sharp knife.
Slowly pour sauce over cake (will look like too much sauce, but cake will absorb it)
Let the cake cool in the pan for 30 minutes before removing from pan.
 Pink Velvet Cupcakes
Recipe courtesy of
Essence Magazine
Think pink--bake for a cure. Breast Cancer Awareness month is a great time to add a touch of sweetness to someone’s life. Pink velvet cupcakes--the perfect way to get your pink on!
INGREDIENTS
1 cup cake flour, sifted
¾ cup all-purpose flour
1 teaspoon baking powder
½ teaspoon coarse salt
2 tablespoon white chocolate, melted
¾ cup (1½ stick) unsalted butter, room temperature
1½ cup granulated sugar
2 item large eggs, room temperature
1 teaspoon pure vanilla extract
½ cup pink gel food color
1 cup buttermilk
1 item Chocolate sprinkles
PREPARATION
Preparation:
1. Preheat oven 350°F. Line muffin pans with paper liners. Whisk together flour, baking powder and salt. Set aside.
2. In a heatproof bowl place white chocolate over a pot of simmering water. Heat until white chocolate is warm; stir with a flexible spatula until melted. Remove bowl and let cool.
3. With an electric mixer on medium-high speed, cream butter and sugar until pale and fluffy. Add eggs, one at a time, scraping down sides of bowl periodically. Mix in vanilla extract and food coloring. Add melted white chocolate, beat until combined. Reduce speed: add flour mixture, alternating with buttermilk, ending with flour beat until combined.
4. Divide batter evenly among lined cups filling three-quarters full. Bake approximately 20-25 minutes, rotating pans halfway through and a toothpick inserted in center comes out clean. Transfer pans to rack or counter to cool before removing cupcakes.
5. To finish, use an offset spatula or small butter knife to spread thin layer of creamy- cheese frosting. With an Ateco design tip (#352) and a piping bag create leaflets in a circular motion leaving center open to add chocolate sprinkles.
Creamy-Cheese Frosting:
Makes: 4 cups
1 cup (2 sticks) unsalted butter, room temperature
12 ounces cream cheese, room temperature
1 pound (4 cups) confectioners' sugar sifted
¾ teaspoon pure vanilla extract
½ teaspoon pink gel food color
With an electric mixer on medium high speed, beat butter and cream cheese until fluffy, 2 to 3 minutes. Reduce speed: add sugar, ½ cup at a time, then mix in vanilla extract and food coloring, combine until smooth, scraping down sides of bowl as needed.










 instead, and incorporate steaming into my weekly deep conditioning routine(I can feel my hair drool in anticipation of combining Anita Grant's Rhassoul Deep Condish with a steamer!!!).










 Posts
Posts