As I've gotten older... I've recognized the benefit of eating healthy and to curtail overindulgences. HOWEVER - Every once and a while, I get an urge to sit back and just feast on something deliciously bad for me.... and not feel guilty because I made it myself, with love!
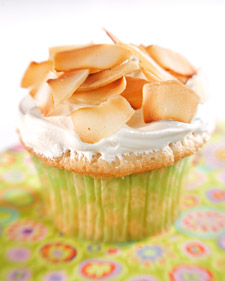
Coconut Cupcakes
Recipe Courtesy of
The Martha Stewart Show
Ingredients
Makes 2 dozen
3 cups cake flour (not self-rising)
2 teaspoons baking powder
1 teaspoon salt
3 sticks (1 1/2 cups) unsalted butter, room temperature
2 1/4 cups sugar
1/2 teaspoon pure vanilla extract
1 cup coconut milk
8 large egg whites
1 1/4 cups shredded sweetened coconut
Seven-Minute Frosting
Fresh Roasted Coconut, for garnish
Directions
Preheat oven to 350 degrees. Line two standard 12-cup muffin pans with paper liners; set aside.
In a medium bowl, whisk together flour, baking powder, and salt; set aside.
In the bowl of an electric mixer fitted with the paddle attachment, beat butter and 2 cups sugar until light and fluffy, 3 to 4 minutes, scraping down sides of the bowl as needed. Beat in vanilla. With mixer on low speed, add flour mixture in three parts, alternating with the milk and beginning and ending with the flour; beat until just combined. Transfer mixture to a large bowl; set aside.
In the clean bowl of an electric mixer fitted with the whisk attachment, beat egg whites on low speed until foamy. With mixer running, gradually add remaining 1/4 cup sugar; beat on high speed until stiff, glossy peaks form, about 4 minutes. Do not overbeat. Gently fold a third of the egg-white mixture into the butter-flour mixture until combined. Gently fold in remaining egg-white mixture; stir in shredded coconut.
Divide batter evenly among the muffin cups, filling each with a heaping 1/4 cup batter. Bake, rotating pans halfway through, until the cupcakes are golden brown and a cake tester inserted in the center of a cupcake comes out clean, 20 to 25 minutes. Transfer pans to a wire rack. Invert cupcakes onto rack; then reinvert and let cool completely, top sides up. Frost cupcakes with seven minute frosting, swirling to cover. Cupcakes may be stored in a covered container in the refrigerator for up to 3 days. Garnish with fresh coconut just before serving.
Eggnog Pudding Cake
Recipe Courtesy of
SouthernCookingAbout.com

Ingredients:
2 large eggs, separated
2 tablespoons softened butter
1/2 cup granulated sugar
2 teaspoons vanilla
pinch salt
dash ground nutmeg
1/4 cup all-purpose flour
1 1/3 cups prepared commercial eggnog
boiling water
Preparation:
Butter six 5- to 6-ounce ramekins or four 7 to 8-ounce ramekins. Heat oven to 350°. Beat egg whites in a small bowl just until soft peaks begin to form; set aside.
In a mixing bowl, beat together the egg yolks, softened butter, granulated sugar, vanilla, salt, and nutmeg. Stir in flour. Stir in eggnog until smooth. The batter will be thin. Fold in the egg whites, working with about 1/3 of the egg whites at a time. Divide the batter among the prepared ramekins.
Place ramekins in a large baking pan; place on middle rack in oven. Ladle boiling water into the pan until the water is about 1 inch in depth.
Bake for 30 to 35 minutes, until pudding cakes are somewhat firm to a light touch. Remove ramekins to a rack to cool slightly, then they may be served with whipped topping or unmold warm cakes on dessert plates and serve with Spiced Vanilla Sauce or a rum sauce.
Makes 4 to 6 cakes.
Chocolate Caramel Cheesecake
Recipe courtesy of
FinestChef.com

Ingredients:
3 packages cream cheese (8 oz. each), softened,
2 cups graham cracker crumbs,
1/3 cup melted butter,
1 cup sugar,
3 oz. caramel sweets,
3 squares baker's semi-sweet chocolate (about 3 oz.),
1 tablespoon artificial vanilla extract,
3 large eggs,
4 squares of chocolate caramel brownies.
Recipe: Combine in a mixing bowl the graham cracker crumbs, 1/4 of the sugar and the melted butter and mix well. Press the crust mixture into the bottom of a 9-inch springform cake pan and chill it in a refrigerator for 20 minutes. In the meantime, beat the cream cheese with the rest of the sugar and the vanilla extract until they are mixed well. Melt the chocolate over double boiler and add it to the mixture pouring it in a thin streak and slowly. Add the eggs one by one and keep beating until blended. Pour the mixture into the crust. Bake in a preheated oven at 325 F for 50 minutes or until the centre of the cheesecake is set. Let it cool down for 10 minutes and in the meantime melt the caramel sweets. Pour the caramel over the cheesecake, cut each brownie to 4 pieces and stick them around the edges of the cheesecake. Refrigerate the caramel cheesecake for at least 6 hours before cutting and serving.
This next recipe almost made me fall out of my bed at its jaw-dropping deliciousness!! It is definitely at the top of my "To Make" List!
S'more Brownies
Recipe Courtesy of
The Food Network

Ingredients
Crust:
6 tablespoons unsalted butter, melted
1 1/2 cups crushed graham cracker crumbs
2 tablespoons sugar
Pinch fine salt
Brownie:
8 tablespoons (1 stick) unsalted butter
4 ounces unsweetened chocolate, chopped
1 cup packed light brown sugar
3/4 cup white sugar
1 1/2 teaspoons pure vanilla extract
1/2 teaspoon fine salt
4 large cold eggs
1 cup all-purpose flour
Topping:
4 cups large marshmallows
Directions
Position a rack in the lower third of the oven and heat oven to 325 degrees F. Line an 8 by-8-inch square baking pan with foil so it hangs over the edges by about 1 inch.
For the crust: Lightly butter the foil with some of the melted butter. Stir the rest of the butter together with the crumbs, sugar, and salt in a medium bowl. Press the crumb mixture evenly over the bottom of the pan. Bake until golden brown, about 20 minutes.
Meanwhile, make the brownie. Put the butter and chocolate in a medium microwave safe bowl. Melt in the microwave on 75 percent power for 2 minutes. Stir, and microwave again until completely melted, about 2 minutes more. Alternatively, put the butter and chocolate in a heatproof bowl. Bring a saucepan filled with 1 inch or so of water to a very slow simmer; set the bowl on the pan without touching the water. Stir occasionally until melted. Stir the light brown and white sugars, vanilla and salt into the melted chocolate. Add the eggs and beat vigorously to make a thick and glossy batter. Add the flour and stir until just incorporated.
Pour batter into the prepared pan. Bake until the top is crispy and a toothpick inserted into the middle comes out mostly clean, with a few crumbs, about 40 to 45 minutes.
Remove from the oven and carefully position a rack about 6 inches from the broiler and preheat on low. Layer marshmallows across the top and toast under the broiler until golden, (keep an eye on it, it can go quick), about 2 minutes. Cool on a rack, gently removing the brownies from the pan using the aluminum flaps. Carefully separate any marshmallow from the foil and fold away. Cut into 12 (2-inch) squares.


















 Posts
Posts